SolidJS is a declarative JavaScript framework used for building UIs and web applications pragmatically and performatively. Even though it's relatively new, its similarity with other JavaScript frameworks like React and Svelte has made it more adoptable for the developer community.
So in this tutorial, I'll give you a complete walkthrough of SolidJS and help you understand the essentials. You'll also build a simple web application with SolidJS to get a better hang of the basics. Finally, I'll compare and contrast it with the most popular framework in town — React.
What is SolidJS?
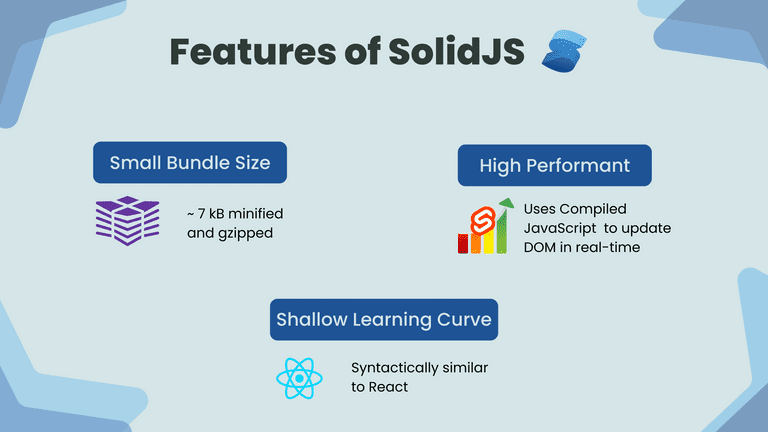
SolidJS takes the syntax and developer experience of React and combines it with the performance of Svelte to give you the best of both worlds.
Just like React, Solid uses JSX to render HTML in the browser. It also uses similar syntax for reactivity to update DOM in real-time. However, unlike React, it uses a compiled DOM instead of virtual DOM.
This means you get a smaller size pure JavaScript bundle, much like the production bundle of your Svelte or Vanilla JS application. This makes it blazingly fast and highly performant.
SolidJS Essentials
Let's now understand the fundamentals of SolidJS using some code examples. To follow along, you can directly run these snippets in the SolidJS playground.
Architecture
Solid follows the component architecture for modularity and reusability. Let's see how you can create an entry component and render it to the DOM.
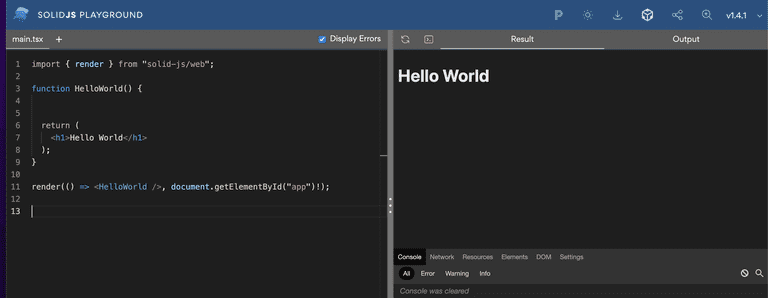
Here's a component HelloWorld that is injected into the DOM inside an HTML element that has an id app:
import { render } from "solid-js/web";

function HelloWorld() {


  return (
    <h1>Hello World</h1>
  );
}

render(() => <HelloWorld />, document.getElementById("app")!);
From the above code, it's also clear that components are functions that return the HTML template using JSX.
Solid components allow only a single JSX element at the top level. To combat this, you can use special JSX elements called fragments:
    <>
     <h1>Hello World </h1>
     <p>This is my first solid app </p>
    </>
Nesting Components
Components can be nested inside one another. For instance, here you have a <Header/>component:
function Header() {
  return (
    <h1>
     Header
    </h1>
  );
}

export default Header;
That is rendered inside the main <App/>component:
import { render } from "solid-js/web";
import Header from './header';

function App() {


  return (
    <>
      <Header/>
      <h1>
      Hello World
      </h1>
    </>
  );
}

render(() => <App />, document.getElementById("app")!);
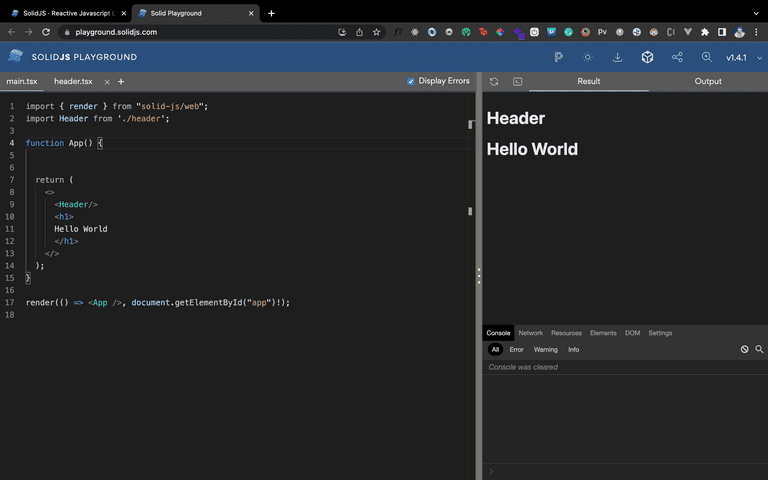
That should give you both the components on the DOM like this:
Props
Props are data and functions you can pass from one component to another to share data and features between the two components. In the previous example, you can pass a title prop to the <Header/> component:
...
    <Header title="Header"/>
...
Then consequently consume this prop inside the child component:
function Header({title}) {
  return (
    <h1>
     {title}
    </h1>
  );
}

export default Header;
Reactivity and Events
Reactivity allows you to create variables that dynamically trigger a DOM update when changed.
SolidJS allows you to create reactive variables called signals using the createSignal function. This function takes in the initial value of the variable as a parameter. And it returns an array where the first element is the variable itself and the second element is a function used to mutate that variable.
Here's an example that changes the reactive variable called name:
import { render } from "solid-js/web";
import { createSignal } from "solid-js";

function DisplayName() {
  const [name, setName] = createSignal('fuzzysid');
  const changeName = () => setName('siddhant')

  return (
    <>
      <h1> {name} </h1>
      <button onClick={changeName}> Change Name </button>
    </>
  );
}

render(() => <DisplayName />, document.getElementById("app")!);
Initially, the name outputs the string 'fuzzysid':
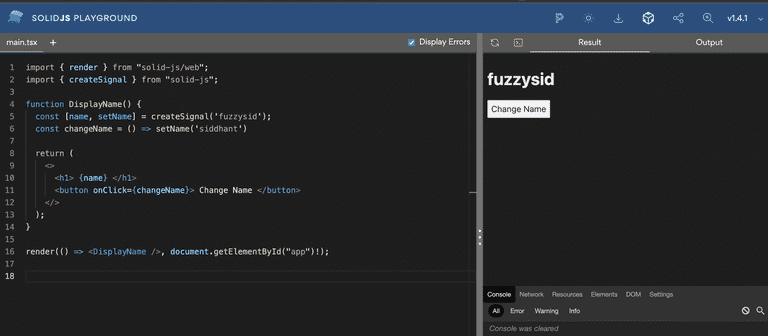
A click event is used on the button that fires a function called changeName. When you press the Change Name button, the changeName function updates the name signal to 'siddhant':
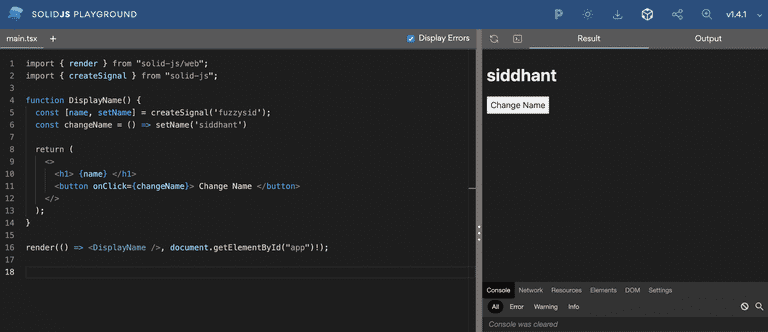
What a state is to React components, a signal is to Solid components. Here's another useful and typical example of reactive variables:
import { render } from "solid-js/web";
import { createSignal } from "solid-js";

function Counter() {
  const [count,setCount] = createSignal(0);

  return (
    <>
      <h1> Counter: {count} </h1>
      <button onClick={()=>setCount(count=>count-1)}>  Decrement </button>

      <button onClick={()=>setCount(count=>count+1)}>  Increment </button>
    </>
  );
}

render(() => <Counter />, document.getElementById("app")!);
You can take the current value of a signal inside the signal's mutation's callback function. The above code used the present value of count to increment and decrement it accordingly.
Effects
Effects are triggers or watchers that can help you fire a function when a signal updates.
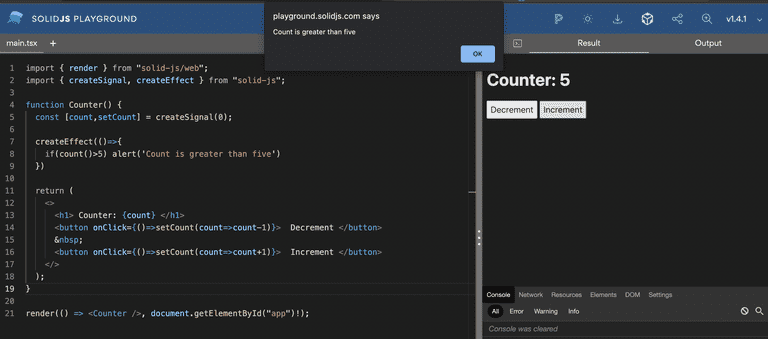
Let's say, in the previous example, you want to throw an alert when the count becomes greater than 5.
To do so, you can create an effect using the createEffect function. It takes a callback function as a parameter. This callback function is fired whenever a signal invoked inside it changes.
createEffect(()=>{
    if(count()>5) alert('Count is greater than five')
})
So now, if you click on the Increment button, you should get an alert when it becomes greater than 5:
Conditionals
Solid provides special components called <Show> to render a template based on a condition or the value of a signal. Here's an example of that:
import { render } from "solid-js/web";
import { createSignal,Show } from "solid-js";

function Counter() {
  const [count,setCount] = createSignal(0);

  return (
    <>
      <h1> Counter: {count} </h1>
      <button onClick={()=>setCount(count=>count-1)}>  Decrement </button>

      <button onClick={()=>setCount(count=>count+1)}>  Increment </button>
      <Show when={count()>5}>
        <p>Count is greater than five </p>
      </Show>
    </>
  );
}

render(() => <Counter />, document.getElementById("app")!);
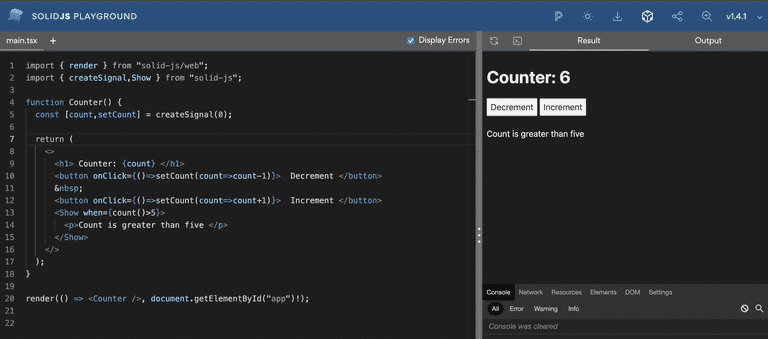
Once the count becomes greater than 5, the <p> will start showing on the DOM:
Loops
Just like <Show>, Solid also provides a special component called <For> to render a list on the DOM from an array.
In the following example, you use the <For> component to render a list of fruits from the fruits signal. Inside the opening brackets of the <For> component, you specify the variable name that will be used to extract items to loop through using the each prop.
Then, you can take a callback inside which you get the individual item as the first parameter and an optional index of the iteration as a second parameter.
import { render } from "solid-js/web";
import { createSignal, For } from "solid-js";

function Counter() {
  const [fruits,setFruits] = createSignal([
    'Mango 🥭',
    'Apple 🍎',
    'Banana 🍌',
    'Melon 🍈',
    'Watermelon 🍉'
  ]);

  return (
    <>
      <h1> Fruits </h1>
      <For each={fruits()}>{(fruit,index)=>
        <div>{index()+1}: {fruit}</div>
      }
      </For>
    </>
  );
}

render(() => <Counter />, document.getElementById("app")!);
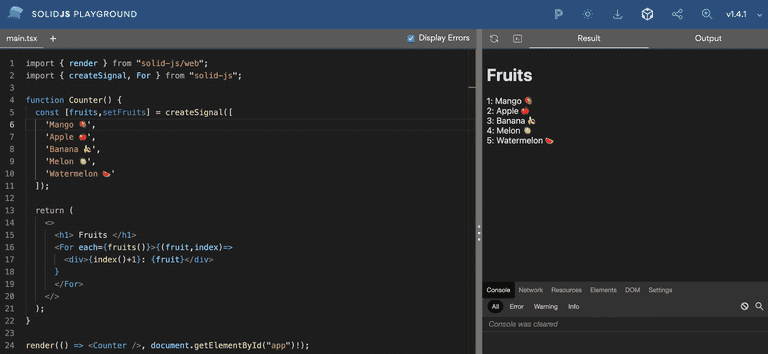
Here's what the list looks like when rendered in the DOM:
Lifecycle Methods
Most frameworks provide several lifecycle methods for different purposes. This often leads to a steeper learning curve as well as unnecessary complexity.
Solid stays truly reactive: it gives you the createEffect and signals to build whatever interaction you want. However, to simplify things further, it gives you two primary lifecycle methods.
onMount
The onMount method is fired just once in the entire lifecycle of a Solid component. It runs only the first time your component mounts on the DOM. It's an excellent place to make any API calls your application needs.
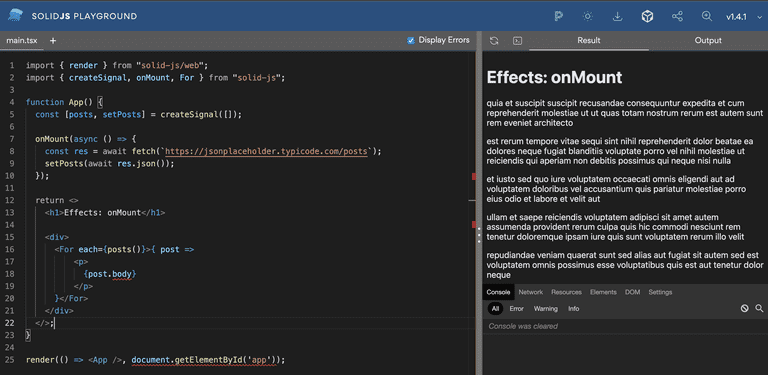
For instance, consider the following example that uses the onMount method to fetch and render some data:
import { render } from "solid-js/web";
import { createSignal, onMount, For } from "solid-js";

function App() {
  const [posts, setPosts] = createSignal([]);

  onMount(async () => {
    const res = await fetch(`https://jsonplaceholder.typicode.com/posts`);
    setPosts(await res.json());
  });

  return <>
    <h1>Effects: onMount</h1>

    <div>
      <For each={posts()}>{ post =>
          <p>
            {post.body}
          </p>
      }</For>
    </div>
  </>;
}

render(() => <App />, document.getElementById('app'));
It renders a list of posts fetched from a dummy API:
onCleanup
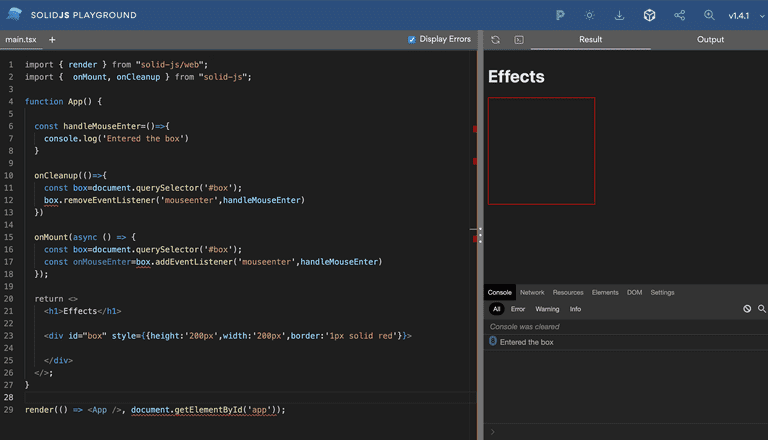
onCleanup is the exact opposite of onMount. It's fired whenever a component unmounts from the DOM completely. Ideally, you can use this method to clear any event listeners you may have added to your DOM elements.
Here's an example that does that:
import { render } from "solid-js/web";
import {  onMount, onCleanup } from "solid-js";

function App() {

  const handleMouseEnter=()=>{
    console.log('Entered the box')
  }

  onCleanup(()=>{
    const box=document.querySelector('#box');
    box.removeEventListener('mouseenter',handleMouseEnter)
  })

  onMount(async () => {
    const box=document.querySelector('#box');
    const onMouseEnter=box.addEventListener('mouseenter',handleMouseEnter)
  });

  return <>
    <h1>Effects</h1>

    <div id="box" style={{height:'200px',width:'200px',border:'1px solid red'}}>

    </div>
  </>;
}

render(() => <App />, document.getElementById('app'));
When you enter the red box, the mouseenter event fires, and you get a message on the console. As a cleanup, when the component unmounts, we remove this event listener from that <div>.
Build a Todo App with SolidJS
Let's combine all that knowledge to build a small todo application with Solid.
Setup
To get started, you'll create a new SolidJS project configured with Vite by running:
npx degit solidjs/templates/js my-appThat should create a new Solid project for you. Navigate inside this project and open it in a code editor (like VS Code):
cd my-app && code .Next, install the dependencies by running:
npm iAnd finally, kickstart the app by running:
npm run startThat should open the project for you at http://localhost:3000. Awesome!
Architecture & Boilerplate Code
Your initial project structure gives the <App/> component by default. This is going to be your entry point component. For starters, clean everything that's inside it:
import styles from './App.module.css';


function App() {

  return (
    <div class={styles.App}>

    </div>
  );
}

export default App;
Notice that you also have an App.module.css file being imported here. It's then referenced inside the <div> container. You'll add all our styles inside this App.module.css file and reference it the same way.
Now let's create some boilerplate files. Here's what the architecture of our Todo app would look like:
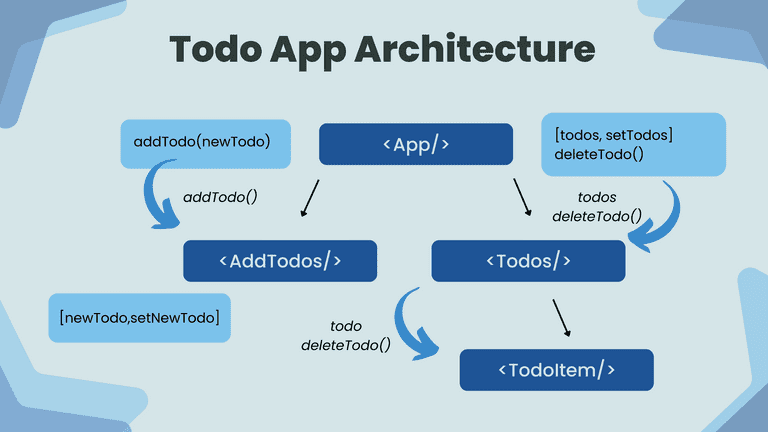
You'll have your top-most parent <App/> component that would store all the todos and the functions to manipulate these todos. This <App/> component will have two child components.
First, the <AddTodo> component will be responsible for adding a new todo.
Second, the <Todos/> component will be responsible for rendering the list of todos via its own child — <TodoItem/> component.
Create a JSX file for each of the above components.
The
The <AddTodo/> component will render an input field and a button. The input field is where the user types a new todo. The button will be used to send this new todo back to a function in the parent <App/> component to add this todo to the todos list. This function will be taken as props inside the <AddTodo/> component.
To store the newTodo, create a signal since you want this property to be reactive based on what the user enters in the input.
const [newTodo,setNewTodo]=createSignal('')Now let's add the template inside the component's JSX:
import {createSignal} from 'solid-js'


function AddTodo({addTodo}){

    const [newTodo,setNewTodo]=createSignal('')


    return(
        <div>
            <input
                onChange={handleChange}
                value={newTodo()} type="text"
                placeholder="Type a new todo..."
            />
            <button onClick={handleClick}>Add Todo</button>
        </div>
    )
}

export default AddTodo;
You bind the input field to the newTodo signal. You now need to create the handleChange function that updates the newTodo signal based on the onChange event.
You also need to create the handleClick function that passes the newTodo signal to the addTodo function prop and clears the input state.
 const handleChange=(e)=>setNewTodo(e.target.value)

 const handleClick=()=>{
        addTodo(newTodo)
        setNewTodo('')
 }
Here's how the entire <AddTodo/> component looks like:
import {createSignal} from 'solid-js'


function AddTodo({addTodo}){

    const [newTodo,setNewTodo]=createSignal('')

    const handleChange=(e)=>setNewTodo(e.target.value)

    const handleClick=()=>{
        addTodo(newTodo)
        setNewTodo('')
    }

    return(
        <div>
            <input
                onChange={handleChange}
                value={newTodo()} type="text"
                placeholder="Type a new todo..."
            />
            <button onClick={handleClick}>Add Todo</button>
        </div>
    )
}

export default AddTodo;
You also need to render this inside the <App/> component:
import styles from './App.module.css';
import {createSignal} from 'solid-js'
import AddTodo from './AddTodo';

function App() {

  const addTodo=(newTodo)=>{

  }

  const deleteTodo=(todo)=>{

  }

  return (
    <div class={styles.App}>
      <h1 class={styles.heading}>Todos</h1>
      <AddTodo addTodo={addTodo}/>
    </div>
  );
}

export default App;
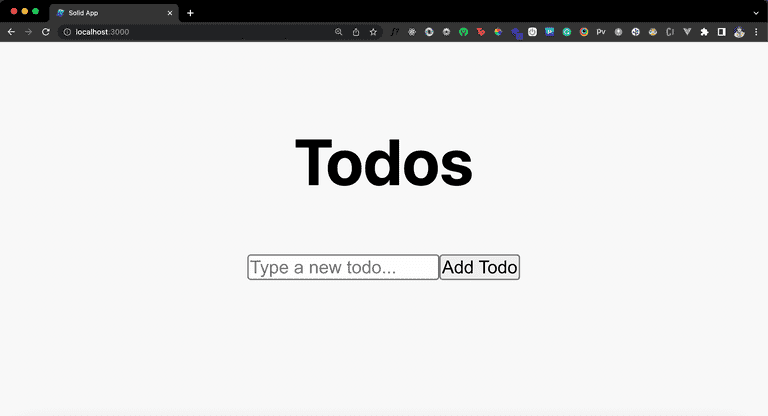
Once you do that, you should see an input field with a submit button rendered by the <AddTodo/> component on the screen:
Rendering Todos
Now let's work on two simple components responsible for rendering the todos. First is the <Todos/> component. As you already know, this component takes in two props — a list of todos called the todos signal and the deleteTodo method.
import { For } from 'solid-js';
import TodoItem from './TodoItem';

function Todos({todos,deleteTodo}){
    console.log(todos())
    return(
        <For each={todos()}>{(todo,ind)=>

        }
        </For>
    )

}

export default Todos;
You use the <For/> component to loop through the list of todos. Now, you need to pass each todo item and the deleteTodo method further down to your <TodoItem/> component. This component is responsible for rendering each list item.
function TodoItem({todo,deleteTodo}){
    const handleDelete=()=>deleteTodo(todo);
    return(
        <p onClick={handleDelete}>{todo}</p>
    )
}

export default TodoItem;
When you click on an item, you invoke the deleteTodo function and pass the clicked todo item as a parameter.
Finally, render the <Todos/> component inside the root <App/> component.
import styles from './App.module.css';
import {createSignal} from 'solid-js'
import Todos from './Todos';
import AddTodo from './AddTodo';

function App() {
  const [todos,setTodos]=createSignal([])

  const addTodo=(newTodo)=>{
  }

  const deleteTodo=(todo)=>{

  }

  return (
    <div class={styles.App}>
      <h1 class={styles.heading}>Todos</h1>
      <AddTodo addTodo={addTodo}/>
      <Todos deleteTodo={deleteTodo} todos={todos}/>
    </div>
  );
}

export default App;
Great! Let's complete the todo app by writing the logic for adding and deleting a todo.
Adding and Deleting Todos
To add a new todo, you only need to complete the logic inside the addTodo function in the <App/> component. This function already takes a newTodo parameter, the new todo item you need to add.
const addTodo=(newTodo)=>{
    setTodos([newTodo(),...todos()]);
}
You'll add the newTodo in the todos signal that is an array using its setter function setTodos. Use JavaScript array destructuring here to ensure to keep the previous todos intact. Let's give this a whirl now:
It looks like you're able to add todos now. Awesome!
To delete the todo when they're clicked, populate your deleteTodo function:
  const deleteTodo=(todo)=>{
    let newTodos=todos;
    newTodos=newTodos().filter(_todo=>_todo!=todo);
    setTodos(newTodos)
  }
First, make a copy of the current todos array. Then, filter through this copy to remove the todo you wish to delete. Finally, update your original todos signal with this copy using the setTodos setter. Let's test it out now:
You can delete todos as well; fantastic!
Styling the App
Functionally your app is complete, but it surely misses some aesthetics. Let's add some simple yet neat-looking styles. You can directly update the styles in our App.module.css file:
*{
  margin: 0;
  padding: 0;
}

.App {
  text-align: center;
  height: 100vh;
  background: #F8F8F8;
  padding: 100px;
  display:flex;
  flex-direction: column;
  align-items: center;
}

.heading{
  font-size: 96px;
  margin-bottom: 20px;
}

input{
  border-radius: 12px;
  outline: none;
  border: none;
  padding: 5px 20px;
  margin-right: 20px;
  height: 60px;
  width: 400px;
  font-size: 24px;
  box-shadow: rgba(0, 0, 0, 0.05) 0px 1px 2px 0px;
}

button{
  height: 65px;
  width: 150px;
  border: none;
  outline: none;
  border-radius: 12px;
  font-size: 24px;
  padding: 5px 15px;
  box-shadow: rgba(0, 0, 0, 0.05) 0px 1px 2px 0px;
  cursor: pointer;
  font-weight: 600;
  background:#2e3136;
  color:#fff;
}

p{
  height: 60px;
  background: white;
  width: 600px;
  text-align: center;
  display: flex;
  align-items: center;
  justify-content: center;
  border-radius: 12px;
  font-size: 24px;
  margin: 20px 0px;
  box-shadow: rgba(0, 0, 0, 0.05) 0px 1px 2px 0px;
}

p:hover{
  background: rgb(232, 169, 146);
  color:#fff;
  cursor: pointer;
}


.header {
  background-color: #282c34;
  min-height: 100vh;
  display: flex;
  flex-direction: column;
  align-items: center;
  justify-content: center;
  font-size: calc(10px + 2vmin);
  color: white;
}
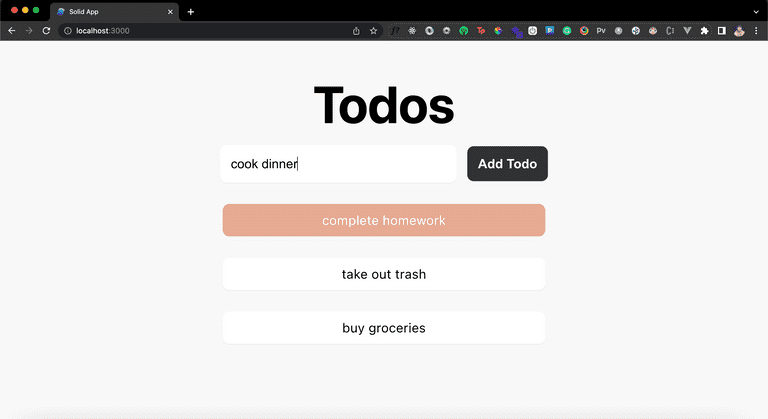
And that should give us a much better-looking todo app now:
SolidJS vs. React
If you're coming from a React background, building the todo app must feel like a piece of cake to you! This is because, in terms of syntax and architecture, Solid is strikingly similar to React. It uses the same structure of using functional components, returning JSX, fragments, one-way data binding, etc.
Using effects, refs and events are also much similar to React in Solid. So it's safe to say that Solid provides almost the same if not slightly different syntactic sugar as React. Then why do we need another React-like framework for building web applications?
Solid differs from React in terms of performance, developer experience, rendering algorithm, and reactivity. Let's skim through the key differences:
Performance
At the beginning of this tutorial, we discussed how Solid doesn't use a virtual DOM. Instead, it uses a compiled DOM. This gives it a significant edge over React and any other framework in terms of run-time performance. It generates a blazingly fast production bundle that is aimed to provide a more rich user experience for your users.
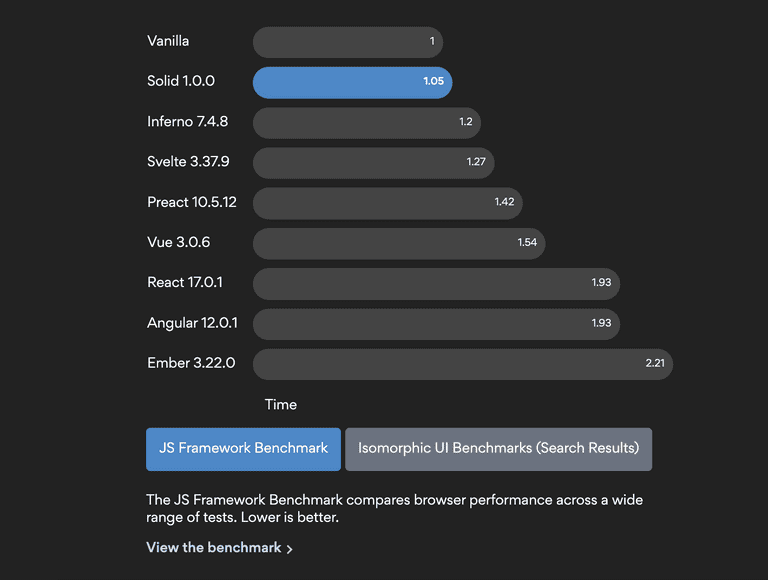
If you wish to dive deeper into these stats and take a closer look at performance benchmarks, here's a comparison guide you can refer to.
Solid is Truly Reactive
Reactivity lies at the heart of SolidJS, which is why you'll never find any unnecessary renders of your Solid components. Only the part of a template that needs to update will re-render.
With React, however, change in a state leads to re-rendering the entire component. There are ways to combat this, but it needs additional efforts to learn and incorporate these concepts into your applications.
Community Support, Documentation, and Resources
Even though Solid has excellent and extensive documentation, the React community is much larger since it has been around for longer. That can be a deal-breaker if you want to build scalable web applications quickly. Even third-party libraries are short in number for Solid in comparison to React.
Conclusion
Solid has an exciting future and is worth a side-project or an MVP for your startup. If you wish to explore Solid in-depth, you can check out an official tutorial by the Solid team here that walks you through every concept in Solid. You can also explore the entire code for the demo in this tutorial here. Until next time!


